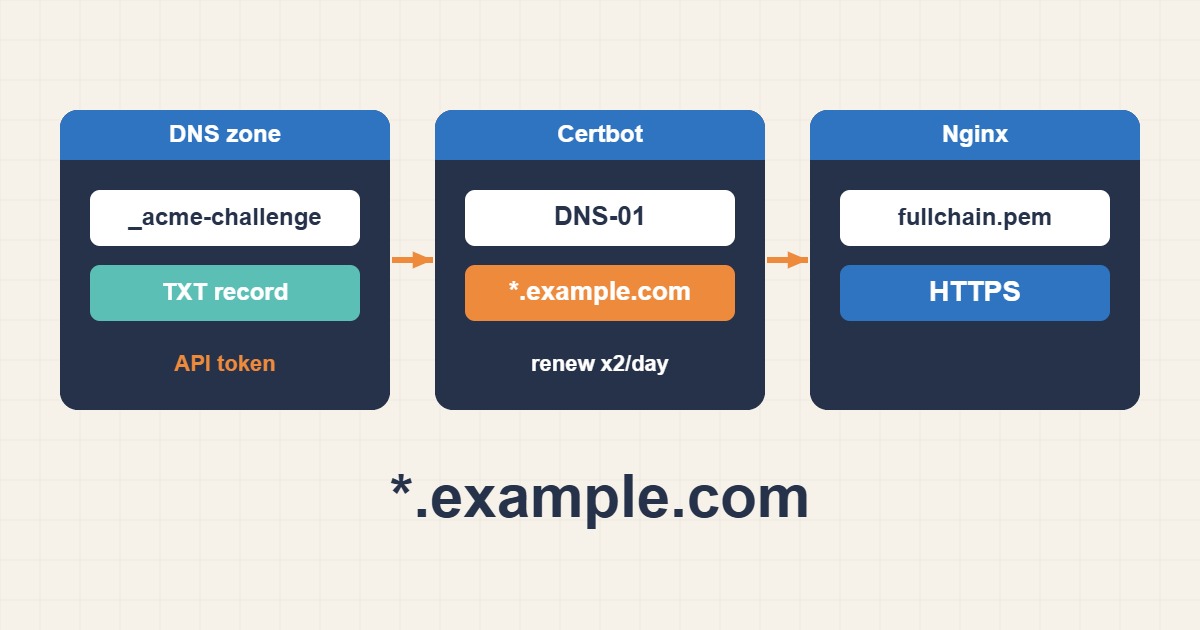
A wildcard certificate secures every subdomain of a domain with one certificate, which is convenient when you run many hostnames or create them on demand. Let’s Encrypt issues wildcard certificates only through the DNS-01 challenge, so the setup differs from the usual web-server validation: you prove control of the domain by publishing a temporary DNS record. This guide shows how to issue a wildcard certificate with Certbot, make renewal fully automatic with a DNS plugin and a scoped API token, wire it into Nginx, and troubleshoot the problems that most often appear on the first try.
1. When a wildcard is worth it
A wildcard such as *.example.com covers one level of subdomains, for example blog.example.com and shop.example.com. It does not cover the bare domain example.com, and it does not cover deeper names such as a.b.example.com. If you have only two or three fixed hostnames, a normal certificate listing them each is simpler and exposes less. A wildcard earns its place when you add subdomains often, host customers on their own subdomains, or want to avoid publishing every internal hostname in public certificate transparency logs.
2. Why DNS-01 is required
The usual HTTP-01 challenge proves control of one specific hostname by serving a file from it, which cannot prove control of every possible subdomain. For wildcards, Let’s Encrypt asks you to create a TXT record named _acme-challenge in the domain’s DNS zone instead. Only someone who controls the DNS can do that, which is the proof the authority needs.
3. Prefer a DNS plugin over manual mode
Certbot’s manual mode asks you to create the TXT record by hand. It works once, but it cannot renew unattended, and a certificate that needs a human every sixty days eventually expires. A DNS plugin creates and removes the record through your DNS provider’s API, so renewal runs by itself. Plugins exist for Cloudflare, Route 53, DigitalOcean and many other providers. The example below uses Cloudflare:
sudo apt install certbot python3-certbot-dns-cloudflare4. Create a narrowly scoped API token
Give the plugin the least access that works. In your DNS provider, create a token that can edit DNS records for only the one zone you are certifying, not a global key that controls your whole account. Store it in a file that only root can read:
# /root/.secrets/certbot/cloudflare.ini
dns_cloudflare_api_token = REPLACE_WITH_SCOPED_TOKEN
sudo mkdir -p /root/.secrets/certbot
sudo chmod 700 /root/.secrets/certbot
sudo chmod 600 /root/.secrets/certbot/cloudflare.iniThe value shown above is a placeholder, not a real token. Never paste a real token into a shell command, a ticket or a chat, and rotate it if it ever leaks. A stolen DNS token lets an attacker change your records and obtain certificates for your domain.
5. Test with a dry run first
sudo certbot certonly --dns-cloudflare \
  --dns-cloudflare-credentials /root/.secrets/certbot/cloudflare.ini \
  --dns-cloudflare-propagation-seconds 60 \
  -d example.com -d '*.example.com' --dry-run
A dry run uses the Let’s Encrypt staging environment, so it does not count against the production rate limits and does not issue a trusted certificate. List the bare domain and the wildcard together, because they are separate names. The propagation option gives the DNS provider time to publish the record before validation starts, and 60 seconds is a safe starting point.
6. Request the real certificate
sudo certbot certonly --dns-cloudflare \
  --dns-cloudflare-credentials /root/.secrets/certbot/cloudflare.ini \
  -d example.com -d '*.example.com' \
  --deploy-hook "systemctl reload nginx"
The --deploy-hook runs only after a successful issue or renewal, so Nginx reloads and starts serving the new certificate without a manual step. Certbot stores the result under /etc/letsencrypt/live/example.com/, and that path stays stable across renewals because it is a symlink to the newest version.
7. Use it in Nginx
server {
    listen 443 ssl;
    server_name example.com *.example.com;

    ssl_certificate     /etc/letsencrypt/live/example.com/fullchain.pem;
    ssl_certificate_key /etc/letsencrypt/live/example.com/privkey.pem;
}
Point both directives at the fullchain.pem and privkey.pem files. Serving only the leaf certificate without the intermediate chain causes errors on some clients; Fix Incomplete TLS Certificate Chains in Nginx: Fullchain and SNI explains that failure. Reload Nginx after any change with nginx -t first.
8. Confirm automatic renewal
systemctl list-timers | grep certbot
sudo certbot certificates
sudo certbot renew --dry-run
Packaged Certbot installs a systemd timer or cron entry that runs twice a day and renews certificates that are close to expiry. The dry-run renewal proves the whole path works, including the DNS plugin and the deploy hook. If it fails, How to Fix Let’s Encrypt and Certbot Renewal Failures on Nginx walks through the common causes.
9. Check CAA records
If your domain publishes CAA records, they decide which authorities may issue certificates, and wildcards have their own tag. A record that allows normal issuance but omits issuewild blocks wildcard issuance in some configurations:
example.com.  CAA  0 issue     "letsencrypt.org"
example.com.  CAA  0 issuewild "letsencrypt.org"
See Fix Certificate Issuance CAA Errors: Check issue, issuewild and CNAMEs for how CAA errors appear and how to fix them.
10. Debug with dig
dig +short TXT _acme-challenge.example.com
dig +short CAA example.com
While validation is running you can query the TXT record to see whether it is visible. If you use split-horizon DNS, make sure the public view contains the record, because Let’s Encrypt validates against your public name servers. Old TXT records left over from a failed attempt are harmless, since a name can carry several values.
11. Delegate the challenge with a CNAME
If your DNS provider has no usable API, or you do not want to give a server any token for the main zone, you can create a CNAME from _acme-challenge.example.com to a name in a separate zone that you control with automation. Let’s Encrypt follows the CNAME, so the main zone never needs to be writable by the server. This is a common pattern for keeping the blast radius small.
12. Know the security trade-off
One wildcard private key protects every subdomain, so a leak affects all of them. Keep the key readable only by root, avoid copying it to many machines, and issue separate certificates for especially sensitive hosts such as an admin panel or payment endpoint. A wildcard is convenient, not a reason to relax how you protect the key.
13. Common mistakes
- Forgetting that
*.example.comdoes not coverexample.com. - Using manual mode and missing the renewal.
- Giving the plugin a global account key instead of a scoped token.
- Skipping the dry run and hitting rate limits.
- Leaving a CAA record that does not allow wildcard issuance.
- Serving only the leaf certificate instead of
fullchain.pem.
14. Rate limits and rotation
Let’s Encrypt limits how many certificates you can issue for the same names in a week and how many validation failures you can have in an hour, and the exact numbers can change, so read the current page in the references before a big rollout. That is the reason the dry run exists: test against staging until the whole chain works, then issue once. Certbot can also keep or replace the private key at each renewal, so decide whether your policy is to rotate keys regularly, and document the answer for the next person.
15. A worked example
A company hosts customer sites on customer1.example.com, customer2.example.com and so on. With one wildcard and the Cloudflare plugin, a new customer subdomain needs only a DNS record and an Nginx server block, with no new certificate request. The first dry run takes a minute or two, and renewal then happens in the background about thirty days before expiry. This is an illustration of the workflow rather than a measurement. Always confirm with certbot certificates that the certificate lists both names you expect.
16. Quick checklist
- Decide a wildcard is justified, and list both
example.comand*.example.com. - Install the DNS plugin and create a scoped token stored with mode 600.
- Run a dry run, then issue the real certificate with a deploy hook.
- Point Nginx at
fullchain.pemandprivkey.pem. - Confirm renewal with
certbot renew --dry-runand the timer. - Check CAA records and protect the private key.
More server guides are collected in the article archive.
Official references
Let’s Encrypt: Challenge Types · Certbot User Guide · Let’s Encrypt: Rate Limits · Let’s Encrypt: CAA