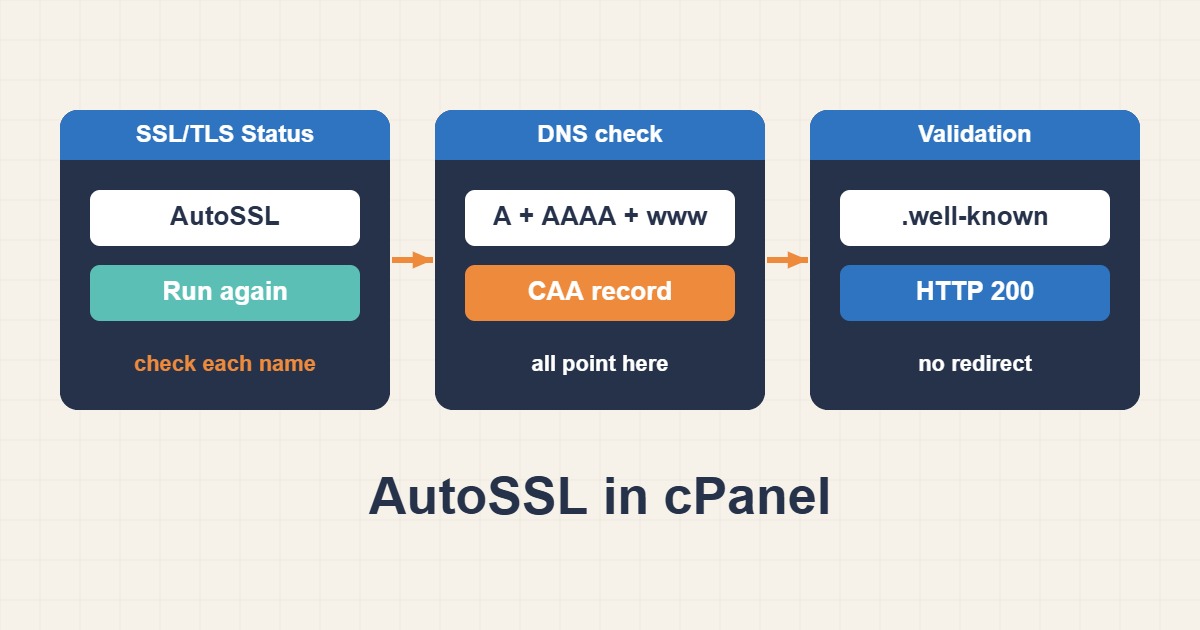
cPanel’s AutoSSL issues and renews free certificates for the domains on your hosting account, so most sites get HTTPS without any manual work. When it fails, the symptom is a missing padlock, a certificate that expired or a status page full of warnings. The usual cause is not cPanel itself but something that stops the validation request from reaching your site. This guide explains how AutoSSL proves that you control a domain, how to read the SSL/TLS Status page, and how to fix the most common failures. Menu names and certificate providers differ between hosts, so use the names below as a guide.
1. What AutoSSL does
AutoSSL checks the domains on the account, requests a domain-validated certificate for each one that passes validation and installs it. It runs on a schedule and renews certificates before they expire. Which authority issues them depends on the host’s configuration, commonly cPanel’s own provider or Let’s Encrypt. A domain-validated certificate proves control of the domain name only, not the identity of the owner.
2. Read the SSL/TLS Status page
In cPanel open SSL/TLS Status. It lists every domain and subdomain, the certificate each one uses, its type and expiry, and a status icon. A domain without a valid certificate shows a warning, and a button lets you run AutoSSL for the account again. Use it after every fix instead of waiting for the next scheduled run. If a domain is excluded, or if the page shows an error for it, note the message and the exact name.
3. How domain control validation works
Before issuing a certificate the provider must confirm that the domain points to your hosting. The usual method is HTTP validation: the system places a small file in a special folder under /.well-known/ on your site and the provider requests it over plain HTTP. If the request reaches the right server and returns the file, validation passes. Some setups can also validate through DNS when the DNS zone is managed on the same server.
4. The most common causes of failure
Look for these in order. The domain’s A record points to another server or to a CDN proxy. The www name has no record, or points elsewhere. An AAAA record sends IPv6 validation requests to a wrong address. A redirect or a firewall rule intercepts the .well-known path. A CAA record does not list the authority. The domain is newly registered or the DNS change has not propagated yet. Each of these is visible with a few commands.
5. Check DNS first
Confirm where the names point and compare the addresses with the IP shown in cPanel:
dig +short example.com A
dig +short example.com AAAA
dig +short www.example.com A
dig +short example.com CAA
Every name you want covered must resolve to this server. A stray AAAA record is a classic hidden problem: the provider tries IPv6 first, reaches another host and fails while your own browser works over IPv4. If a name points to a CDN, validation can fail unless the CDN passes the validation path through. After a DNS change, wait for the old TTL, as Fix DNS_PROBE_FINISHED_NXDOMAIN Errors explains for name problems.
6. Test the validation path
You can imitate what the provider does. Create a harmless text file in the folder, then request it over HTTP:
curl -I http://example.com/.well-known/pki-validation/test.txt
curl -I http://www.example.com/.well-known/acme-challenge/test
A 200 response with the file content means the path works. A 301 to HTTPS, a 403 or a WordPress 404 means something is intercepting it. Remove your test file afterwards.
7. Exclude the validation path from redirects
A common mistake is an HTTP-to-HTTPS redirect that also catches the validation request. If a site has no valid certificate yet, the redirect leads to a certificate error and validation fails. Exclude the validation folders from the rule:
RewriteEngine On
RewriteCond %{REQUEST_URI} !^/\.well-known/acme-challenge/
RewriteCond %{REQUEST_URI} !^/\.well-known/pki-validation/
RewriteCond %{REQUEST_URI} !^/\.well-known/cpanel-dcv/
RewriteCond %{HTTPS} off
RewriteRule ^(.*)$ https://%{HTTP_HOST}%{REQUEST_URI} [L,R=301]
Put this before the WordPress block in .htaccess. Also check security plugins and ModSecurity rules that might block requests to hidden folders, and remove any rule that denies access to dot-folders.
8. Check CAA records
If the domain has CAA records, they restrict which authorities may issue. A record for a different authority blocks your host’s provider, and AutoSSL reports a failure. Look at the records you saw in the DNS check and add the right authority if needed. An example for one authority looks like this, and the exact names depend on your provider:
example.com.  3600  IN  CAA  0 issue "letsencrypt.org"
example.com.  3600  IN  CAA  0 issuewild "letsencrypt.org"
For how these records are interpreted and the pitfalls, see Fix Certificate Issuance CAA Errors: Check issue, issuewild and CNAMEs.
9. Cloudflare and other proxies
With a proxy in front, the validation request reaches the proxy first. Pausing the proxy for the hostname for a short while often lets AutoSSL succeed, and then you can enable it again. For a permanent setup choose a mode that validates the origin certificate, so the certificate on the server matters. If the chain looks wrong to some clients, Fix Incomplete TLS Certificate Chains in Nginx: Fullchain and SNI explains complete chains.
10. Verify the installed certificate
After AutoSSL succeeds, check what visitors actually receive, including the issuer and the dates:
openssl s_client -connect example.com:443 -servername example.com /dev/null | openssl x509 -noout -subject -issuer -datesThe subject name and expiry should match your expectation. If the old certificate is still served, wait a moment, clear caches and test again. A cached page or a CDN can hide the new certificate for a while.
11. Wildcards and special cases
AutoSSL normally issues certificates for named hostnames, and wildcard support depends on the provider and DNS setup. If you need a wildcard certificate, ask the host, or install one you obtained elsewhere through the SSL/TLS area. When you install a certificate manually, remember it does not renew automatically unless a tool handles it, so put the expiry date in your calendar. Related renewal problems on your own server are described in How to Fix Let’s Encrypt and Certbot Renewal Failures on Nginx.
12. After HTTPS works
Once the certificate is valid, force HTTPS with a redirect and update the WordPress addresses to the HTTPS version. Then look for mixed content, which makes the padlock show a warning. Fix WordPress Mixed Content After HTTPS explains how to find and fix it. Add HSTS only after you are sure every subdomain works over HTTPS, because browsers remember it.
13. Common mistakes
- Forgetting that the
wwwname needs its own working record. - Leaving an old AAAA record that points to another server.
- Redirecting everything to HTTPS before a certificate exists, including validation requests.
- Ignoring CAA records created long ago.
- Trusting the browser alone, which may hide an IPv6 failure.
- Installing a manual certificate and forgetting renewal.
14. A worked example
A new domain shows a warning on SSL/TLS Status for the www name. The DNS check shows the bare domain pointing to the host but www still pointing to the old registrar page. The owner fixes the record, waits for the TTL, runs AutoSSL again and the warning disappears. This is an illustration of the process, not a measurement from a real account.
15. Quick checklist
- Open SSL/TLS Status and note the failing names.
- Check A, AAAA, www and CAA records.
- Test the validation path over HTTP.
- Exclude
.well-knownfrom redirects and firewall rules. - Run AutoSSL again and verify the served certificate.
- Force HTTPS and fix mixed content.
More server guides are collected in the article archive.
Official references
cPanel: SSL/TLS Status · cPanel: Manage AutoSSL · Let’s Encrypt: Challenge Types · Let’s Encrypt: CAA