Changing the PHP version in cPanel takes a few clicks, which is exactly why it breaks so many WordPress sites. A newer version removes old features, an older version drops support for modern plugins, and the white screen or 500 error appears the moment you press Apply. This guide shows how to check what you run today, pick a version that WordPress and your plugins support, change it per domain in cPanel, and roll back quickly if something fails. Menu names differ slightly between hosting providers and cPanel themes, so treat the names below as a guide.
1. Why the PHP version matters
PHP releases have a support window. After a version reaches end of life it no longer receives security fixes, so staying on it leaves known bugs open. Newer versions also tend to run WordPress faster. On the other side, old plugins and themes may use functions that were removed, and they stop working on a new version. The goal is a version that is still supported by the PHP project and still compatible with everything you run.
2. Check what you run now
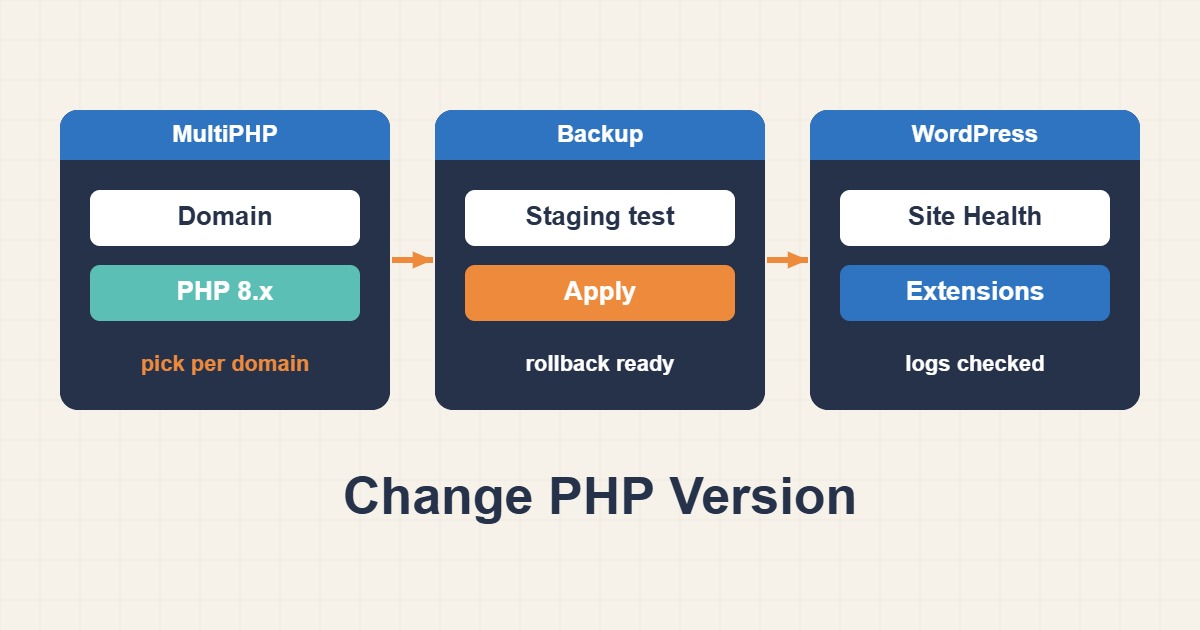
Start with facts instead of memory. In the WordPress dashboard, the Site Health screen shows the PHP version used by the website. If your hosting plan includes SSH, you can also check from the terminal, but remember that the command line may use a different PHP from the web server:
php -v
php -r 'echo PHP_VERSION, PHP_EOL;'
wp --info | grep -i 'php'
The version shown on the website is the one that matters for visitors. Write it down before you change anything, because it is your rollback target.
3. Choose a target version
Read the supported-versions page of the PHP project and the requirements page of WordPress, listed in the references. Pick a version that is supported by both and that your host offers. Jumping several major versions at once is riskier than moving one step at a time, because deprecated features accumulate. If a plugin is abandoned and does not list support for the target version, plan its replacement before the change.
4. Prepare before you click
Take a fresh backup of files and database, and test on a staging copy if your host offers one or if you can create a subdomain copy. The safest order is: update WordPress core, plugins and themes first, then change PHP. Updated code is more likely to support the new version. List what is installed so you can compare later:
wp plugin list --status=active --fields=name,version,update
wp theme list --fields=name,status,version,update
wp core version
Staging gives you a place to see errors without visitors. If you need a method, Safe WordPress Staging: Isolate Access, Email and Payments covers isolating a copy safely.
5. Change the version with MultiPHP Manager
In cPanel open MultiPHP Manager. It lists your domains and the PHP version each one uses. Tick the domain, choose the new version in the dropdown and press Apply. Different domains and subdomains can use different versions, which is useful for testing: set the staging subdomain first, check it, and only then change the live domain. The change normally takes effect within moments.
6. Understand the handler lines in .htaccess
When you change versions, cPanel may add a block to the .htaccess file that tells Apache which PHP handler to use. It looks like this, and the exact name depends on the version and handler on your server:
# php -- BEGIN cPanel-generated handler, do not edit

  AddHandler application/x-httpd-ea-php83___lsphp .php .php8 .phtml

# php -- END cPanel-generated handler, do not edit
Do not edit or copy this block to another server, because the handler name may not exist there and the site would return an error. If you delete the block by mistake, selecting the version again in MultiPHP Manager normally restores it. A broken .htaccess is one cause of the 500 error described in Fix WordPress 500 Internal Server Error.
7. Check PHP extensions
Each PHP version has its own list of extensions. A plugin that needs imagick, intl or mbstring fails if that extension is not enabled for the new version. Depending on the host, extensions are managed in a MultiPHP-related page or in a tool often named Select PHP Version. After the change, reopen that page for the new version and enable what your site needs. WordPress Site Health also warns about missing modules.
8. Test the important paths
Do not stop at the home page. Open an article, log in to the dashboard, save a post, upload an image, submit a contact form and, for a shop, add a product to the cart. These paths use different plugins and hit different code. Look at the browser for white screens and at the server for logged errors.
9. Read the error log
Errors are usually written to a file called error_log in the site folder, and many hosts also show errors in the Metrics section of cPanel. You can also have WordPress write its own log without showing messages to visitors:
define( 'WP_DEBUG', true );
define( 'WP_DEBUG_LOG', true );
define( 'WP_DEBUG_DISPLAY', false );
Reproduce the problem, then read the logs:
tail -n 50 ~/public_html/error_log
tail -n 50 ~/public_html/wp-content/debug.log
Turn debug logging off afterwards, and make sure the log is not publicly downloadable. A line such as “Call to undefined function” or “Class not found” normally points to a plugin or theme that is not compatible with the new version.
10. Handle a site that is already broken
If the dashboard is unreachable, you can still act from cPanel. First, set the PHP version back to the previous one in MultiPHP Manager and the site should return. If you want to stay on the new version, rename the suspect plugin folder in File Manager, or use WP-CLI over SSH when available:
wp plugin deactivate suspect-plugin
wp theme activate twentytwentyfour
Renaming a plugin folder deactivates it. Test again after each step, and re-enable plugins one by one until the failing one is identified.
11. Stale code after the change
Some hosts cache compiled PHP. If the site still behaves like the old version or shows odd errors right after you update files, see Fix Stale PHP Code After Deployment with OPcache for OPcache issues. Also clear your page cache plugin and any CDN cache before judging the result.
12. Keep the version current
Put a reminder in your calendar to review the PHP version every few months. Hosts announce when old versions will be removed, and a forced change on the host’s schedule is worse than a tested one on yours. Subscribe to your provider’s notices and keep plugins updated so you are never locked to an old version by one abandoned plugin.
13. Common mistakes
- Changing the live domain first instead of testing on staging.
- Jumping several major versions without reading plugin compatibility.
- Forgetting to re-enable extensions for the new version.
- Copying the handler block of
.htaccessto another host. - Checking only the home page after the change.
- Leaving debug output visible to visitors.
14. A worked example
A site runs an older but still supported PHP version. The owner takes a backup, updates WordPress and the plugins, then creates a staging subdomain and sets it to the next version in MultiPHP Manager. The log shows one deprecated warning from a small plugin, which the developer has already fixed in an update. After testing login, posting and checkout, the owner changes the live domain and watches the log for an hour. This is an illustration of the process, not a measurement from a real site.
15. Quick checklist
- Note the current version and take a full backup.
- Update WordPress, plugins and themes first.
- Pick a version supported by PHP and WordPress.
- Test on staging, then change the live domain in MultiPHP Manager.
- Enable the extensions your site needs for the new version.
- Check key pages and logs, and keep the rollback ready.
More server guides are collected in the article archive.
Official references
cPanel: MultiPHP Manager · PHP: Supported Versions · WordPress: Requirements · WordPress: Debugging in WordPress